The following image shows the standard view as soon as a new textual programme has been created.
The red box shows the programme name and the current TCP position of the robot. There are also buttons that can be used to insert the corresponding values (in a specific format) directly into the text editor. Clicking on the i button at the top right opens a help window in which all textual commands are briefly described.
The last line in the red box contains a quick editing option for the programme code. However, this is primarily only advantageous and recommended for small changes if no (physical) keyboard is available or can be connected.
There are three buttons in the yellow box:
- Export (left): Export the current programme as a ZIP file together with all its existing configurations and required files
- Save (centre): Saves the current programme
- Execute (right): Open the Execute programme menu to start an execution


Configuration block
Every horstSCRIPT programme has a configuration block, which can be seen in the blue box. This is created automatically when a programme is created. Normally nothing needs to be changed in the configuration block. The two curly brackets '{' and '}' define this configuration block. Everything within these curly brackets is therefore part of the configuration.
There are individual 'config(...);' lines within the configuration. These define/configure various attributes of a programme. The first value specifies what is configured (name/description of the attribute). The second value specifies which value is assigned to the attribute.
config("robot.horstproto", "Horst900S4Fast");
Describes the robot model for which this programme was written or designed. As the kinematics are different for the versions, not every robot can move to every point. The robot type is therefore entered here. In this case Horst900S4Fast.
config("tool", "No Tool");

config("world", "EMPTY_WORLD");
Describes which tool and which 3D world is stored in the programme. In this case, no tool and the empty standard 3D world are stored.
config("scripttype", "textual");
Describes whether the programme is a graphical or textual programme.
config("tcp.weight", "2.5")
Describes how heavy the tool is, including the object in/on the tool. Any value from 0.0 kg up to a certain upper limit can be entered here, which varies depending on the robot model. The higher the value, the slower the robot moves in order to avoid step losses with a high weight.
config("version", "2022.04");
Describes which horstFX version was used to create the programme.
config("io.config.file", "standard_name.io");

config("io.config.checksum", "f4779a85");
Adding commands
Various commands can be added via the respective command window using the Add command button in the command area (green box). This is done in the same way as in graphical programming, except that the added command is added to the text editor in text form.
Definition von Variablen und Funktionen
To define a variable in JavaScript, a corresponding name is passed to the var command. In the programme sequence, variables are declared as follows:
var Approachheight= 0.05;

var Approachheight= 0.05;

var OffsetX = 0.04;

var OffsetY = 0.06;
The variables can be assigned a value directly, as shown in the example above. This assignment can also be made later in the program and is not absolutely necessary during initialisation.
The identifier function is used to define functions. As shown in the example below, a function name is assigned and the function is defined in the method body. The method body is characterised by two curly brackets.
function GripperInit(){
setOutput
The variables can be assigned a value directly, as shown in the example above. This assignment can also be made later in the program and is not absolutely necessary during initialisation.
The identifier function is used to define functions. As shown in the example below, a function name is assigned and the function is defined in the method body. The method body is characterised by two curly brackets.
Example:
////////////////////////////////////functions/////////////////////////////////////////////

function GripperInit(){
setOutput("TOOL_OUTPUT_1", 1.0);
sleep(100);
setOutput("TOOL_OUTPUT_2", 0.0);
}
In the example above, the function GripperInit is defined. The method body contains methods to set the signals of the tool outputs and a wait function.
IF-Conditions, For-loop, While-loop, Switch-Case
To implement an IF-condition in the programme, an If-else block is added to the programme. Basically, this command is structured as follows:
if(CONDITION_1){
iF CONDITION 1 is fulfilled, then this code is executed
} else if (CONDITION _2){
If CONDITION_2 is fulfilled, then this code is executed
} else {
else
}
Example:
var i = 12;
if (i < 0.5) {
    moveJoint(0.62100, 0.00000, 0.69726, 0.70711, 0.00000, 0.70711, 0.00000, 0.5);
} else if (i > 10) {
    showInfo("i is greater than 10");
} else {
    sleep(500);
}
To implement a repeat loop that runs until a certain condition changes, the while loop can be used. As long as the condition is fulfilled (=true), the method body is executed.
while(CONDITION){
...CODE...
}
Example:
var speed = 0.50;
while (speed <= 1) {
    moveJoint(0.10432, 0.61218, 0.69726, 0.54037, -0.45607, 0.54037, 0.45607,speed);
    sleep(500);
    moveJoint(0.62100, 0.00000, 0.69726, 0.70711, 0.00000, 0.70711, 0.00000,speed);
    speed+=0.050;
}
To intercept special cases, i.e. to execute a method based on a specific variable value, the switch case statement can be implemented. Each case is ended with a break-command.
switch(case_variable){
case(1): ....CODE... break;
case(2): ...CODE... break;
case(3): ...CODE... break;
}
Example:
var season = 1;
switch (season) {
            case (1):
                  showInfo("Spring.");
                  break;
            case (2):
                  showInfo("Summer.");
                  break;
            case (3):
                  showInfo("Autumn.");
                  break;
            case (4):
                  showInfo("Winter.");
                  break;
}
Operators JavaScript
General assignment operators
-png.png?width=688&height=294&name=image-png-Nov-14-2023-01-43-10-3347-PM%20(1)-png.png)
Comparison operators
Comparison operators can be used to compare two variables/values etc. The result is the value TRUE/False.
Arithmetic operators

Logical operators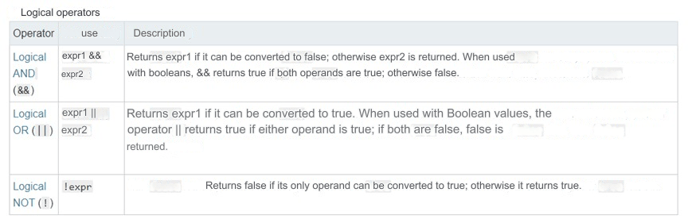
Further information and cheat sheets
For further information on programming with JavaScript, please refer to the various cheat sheets:
https://websitesetup.org/javascript-cheat-sheet/
https://htmlcheatsheet.com/js/
For specific questions about the implementation of JavaScript code, you can also refer to the information provided by the stackoverflow community:
https://stackoverflow.com/questions/tagged/javascript